8 min read
VMware to Proxmox VE Migration via Ansible and Ascender

Once we choose a system, we often feel married to it. The idea of migrating our infrastructure seems more expensive than the new price the vendor just handed us for what we are using. I’ve felt/seen this with software, cloud providers, and hypervisors. While this can be the truth at first glance, automation can level the playing field. Case in point, I’m about to demonstrate how to migrate a Rocky VM from VMWare to Proxmox VE completely via automation.
Video

Overview
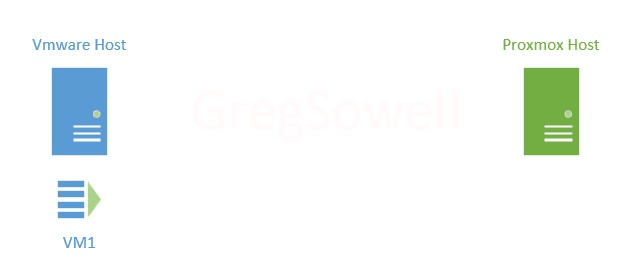
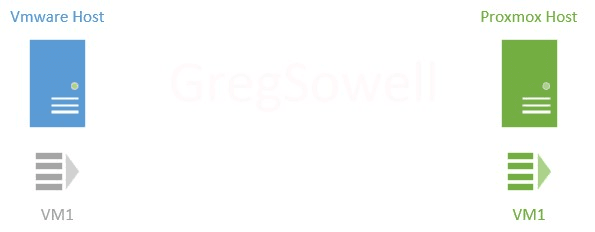
I thought I might quickly begin by describing the process with graphics.
First, we have a VMWare cluster and our Proxmox cluster. As you can see, I have a virtual machine(VM1) that I want to migrate from VMware over to Proxmox.
My first step is to use automation to connect into the running VM and prep it for migration. My Rocky host didn’t have the Virtio drivers in the initramfs, so I need to add them. The initramfs is a file system that boots into RAM that allows the kernel to mount the disks and do the actual file system boot. Your mileage may vary… perhaps these are already in your boot system, so give it a test as is and see how your system responds. Once the prep work is done, the VM is shut down.

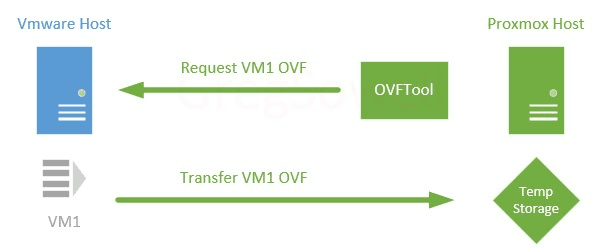
Next, we install VMware’s OVFTool somewhere to extract the VMs as OVFs from the VMware system. For my small demo, I’m going to install it on my Proxmox host and do the migrations directly from there. You will do the migrations to a temporary storage location either directly on the Proxmox host or via something like an NFS share mapped to the host. If you are doing this to an NFS share, you could easily be running the OVFTool from a completely separate server (this would cause the least impact to your Proxmox host).
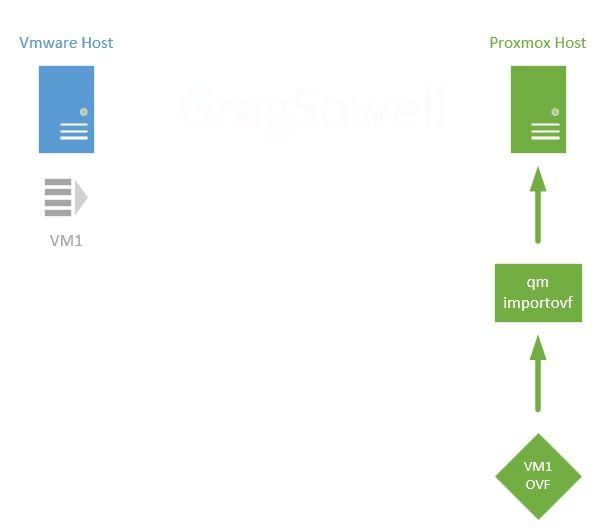
Now on the Proxmox host: I’ll use the qm importovf command to bring the newly created VM1 OVF into the system as a VM.
Before starting the VM, we’ll need to modify any hardware settings required for this specific VM. Again, this is a “your mileage may vary” scenario. In my case, I had to update the bios, add an efi disk for the new bios, modify the CPU type, and reconfigure the networking.
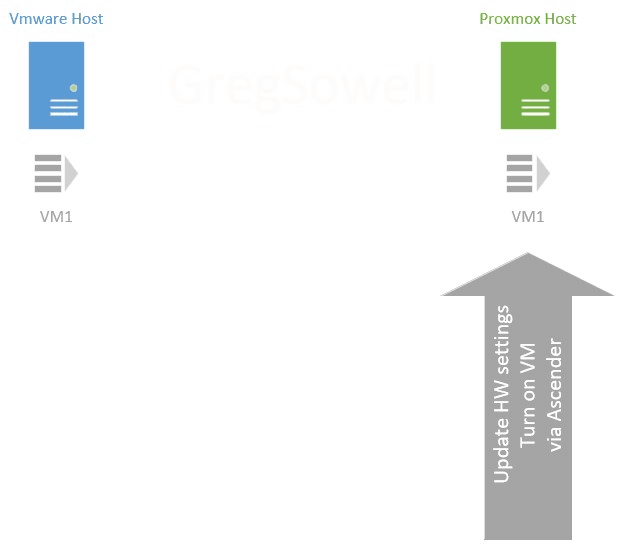
Now the last step is pretty simple; all that needs to be done is to start the new VM.
Playbooks
All of my playbooks can be found here in my Git repository.
The whole process actually took a good bit of work to figure out (really down to driver/bios issues), so hopefully I can save you some time and effort.
preconfigure-hosts.yml
This playbook’s purpose is to do any preconfiguration work necessary. In my case, the prework is to update the initramfs with virtio drivers and then to shut the machine down (OVFTool needs the VM to be shut down before it can migrate it). Depending on your environment and OS, there may be different things required. Here you could also do things like backup network configuration settings so that when the migration is complete you can apply them.
---
- name: Preconfigure the VMWare hosts for migration
  hosts: all
  gather_facts: false
  vars:
  tasks:
    - name: Connect to hosts and add virtio drivers to boot(using virtio in proxmox)
      ansible.builtin.shell: 'dracut --add-drivers "virtio_scsi virtio_pci" -f -v /boot/initramfs-`uname -r`.img `uname -r`'
      register: driver_install
#      dracut: *** Creating initramfs image file '/boot/initramfs-5.14.0-162.23.1.el9_1.x86_64.img' done ***
#      failed_when: based on the above

    - name: Shutdown the host
      community.general.shutdown:
In this playbook, I create the new boot file based on the name of the kernel currently running (the uname -r portion).
migrate-vms.yml
Next, the migrate playbook is run. This is what actually grabs the OVF, imports into Proxmox, and updates all settings.
---
- name: Use ovftool to pull vms from vmware and import into proxmox
  hosts: all
  gather_facts: false
  vars:

    proxmox_auth: &proxmox_auth
      api_host: proxmox.gregsowell.com
      api_user: "{{ gen2_user }}"
      # api_user: root@pam # username format example
      # Use standard password
      api_password: "{{ gen2_pword }}"
      # Use api token and secret - example format
      # api_token_id: gregisa5.0
      # api_token_secret: 72a72987-ff68-44f1-9fee-c09adaaecf4d

    #Full path to ovftool directory
    ovftool_path: /root/ovftool

    #Hostname or IP of vmware vcenter
    vmware_host: 10.0.2.10

    #Hostname or IP of proxmox
    proxmox_host: proxmox.gregsowell.com

    #Datacenter the VMs are in
    vmware_datacenter: MNS

    #Directory path to vms
    vmware_directory: Greg/ciq

    #VMware username
    # vmware_username: administrator
    vmware_username: "{{ gen1_user }}"

    #VMware password
    # vmware_password: test
    vmware_password: "{{ gen1_pword }}"

    #Proxmox migration folder
    proxmox_migration_dir: /root/migration

    #Storage proxmox will import new vms into with qm import command
    proxmox_storage: local-lvm

  tasks:
    - name: Add proxmox host to inventory
      ansible.builtin.add_host:
        name: "{{ proxmox_host }}"
        # groups: just_created
        ansible_host: "{{ proxmox_host }}"
      run_once: true

    - name: Create the proxmox migration directory if it doesn't exist
      ansible.builtin.file:
        path: "{{ proxmox_migration_dir }}"
        state: directory
        mode: '0755'
      delegate_to: "{{ proxmox_host }}"
      run_once: true

    - name: Check for each host and see if they already have an export folder created
      stat:
        path: "{{ proxmox_migration_dir }}/{{ hostvars[inventory_hostname].config.name }}"
      register: directory_status
      delegate_to: "{{ proxmox_host }}"

    - name: Block for exporting/importing hosts
      when: inventory_hostname != proxmox_host and ( not directory_status.stat.exists or not directory_status.stat.isdir )
      block:
        - name: Run ovftool to export vm from vmware to proxmox server if folder isn't already there
          ansible.builtin.shell: "{{ ovftool_path }}/ovftool --noSSLVerify vi://{{ vmware_username }}:{{ vmware_password }}@{{ vmware_host }}:443/{{ vmware_datacenter }}/vm/{{ vmware_directory }}/{{ hostvars[inventory_hostname].config.name }} ."
          args:
            chdir: "{{ proxmox_migration_dir }}/"
          delegate_to: "{{ proxmox_host }}"
          no_log: true

        - name: Call task file to provision new proxmox vm.  Loop over hosts in play
          ansible.builtin.include_tasks:
            file: import-ovf.yml
          run_once: true
          loop: "{{ play_hosts }}"

        - name: Modify proxmox vms to have required settings
          community.general.proxmox_kvm:
            <<: *proxmox_auth
            name: "{{ hostvars[inventory_hostname].config.name }}"
            node: proxmox
            scsihw: virtio-scsi-pci
            cpu: x86-64-v2-AES
            bios: ovmf
            net:
              net0: 'virtio,bridge=vmbr0,firewall=1'
            #   net0:
            #     bridge: vmbr0
            #     firewall: 1
            #     model: virtio
            efidisk0:
              storage: "{{ proxmox_storage }}"
              format: raw
              efitype: 4m
              pre_enrolled_keys: false
            update: true
            update_unsafe: true
          register: vm_update
          delegate_to: localhost

        # - name: Run qm create network interface
        #   when: inventory_hostname != proxmox_host
        #   ansible.builtin.shell: "qm set {{ vm_update.vmid }} --net0 virtio,bridge=vmbr0,firewall=1"
        #   delegate_to: "{{ proxmox_host }}"

        - name: Start VM
          community.general.proxmox_kvm:
            <<: *proxmox_auth
            name: "{{ hostvars[inventory_hostname].config.name }}"
            node: proxmox
            state: started
          delegate_to: localhost
          # ignore_errors: true
I’ll attempt to cover the highlights instead of the entire playbook (which I do cover in the video).
Task number 2 (Check for each host and see if they already have an export folder created) checks to see if the directory for the current host has already been migrated. This is used in the migration conditional later, so that if it already exists it won’t be exported/imported again.
Once the OVF has been created, the (Call task file to provision new proxmox vm. Loop over hosts in play) task is run. This task runs once as a loop over a variable that contains all of the hosts in the current play (play_hosts which is a magic variable). For each host, it will locate the next available Proxmox vid and then it will import the OVF.
import-ovf.yml
---
- name: Find the next available vmid
  ansible.builtin.shell: pvesh get /cluster/nextid
  register: next_vmid
  delegate_to: "{{ proxmox_host }}"

# qm importovf 400 Greg-rocky8-to-9-conversion/Greg-rocky8-to-9-conversion.ovf local-lvm
- name: Run qm import with the new next_vmid
  when: item != proxmox_host
  # ansible.builtin.shell: "{{ ovftool_path }}/ovftool --noSSLVerify vi://{{ vmware_username }}:{{ vmware_password }}@{{ vmware_host }}:443/{{ vmware_datacenter }}/vm/{{ vmware_directory }}/{{ hostvars[inventory_hostname].config.name }} ."
  ansible.builtin.shell: "qm importovf {{ next_vmid.stdout }} {{ hostvars[item].config.name }}/{{ hostvars[item].config.name }}.ovf {{ proxmox_storage }}"
  args:
    chdir: "{{ proxmox_migration_dir }}/"
  delegate_to: "{{ proxmox_host }}"
Once all OVFs have been imported, we need to modify their hardware settings via this task (Modify proxmox vms to have required settings).
You can see with the proxmox_kvm module I’m using the update: true option. This works for most of the options I’m trying to modify, but it DOESN’T allow me to update my network settings or create an EFI disk, which is required for proper operation. To fix this, you have to use the update_unsafe: true option. They have this because in the update I could break configs that result in data loss, but in this case I’m only adding required components on my new install, so I’m good to go.
Manual Testing
While the automation is awesome, you will likely still want/need to do some manual testing. I’ve got the various steps here in brief so you can do just that.
Install OVFTool
Visit this VMware page and grab whichever version of OVFTool is appropriate for you. I grabbed the 4.4.3 archive. I extracted it with tar and made the ovftool and ovftool.bin files executable. I put this on my Proxmox host as I was running all the commands from there.
VM Prep
On the VMs you intend to migrate, you can run the following command to see if you have the virtio drivers on your machine:
find /lib/modules/`uname -r` -type f -name virtio_*
If they are present (which has always been the case for me), you can run the manual steps to create the new initramfs file:
dracut --add-drivers "virtio_scsi virtio_pci" -f -v /boot/initramfs-`uname -r`.img `uname -r`
Browse For VMs With OVFTool
There’s a specific folder structure your VMs will follow. To browse around and make sure things are where you expect them to be, you can use the following command:
ovftool --noSSLVerify vi://username:password@host:443/YourDatacenter/vm
My environment doesn’t have a valid cert on the vcenter, so I’m using the noSSLVerify option.
You can also leave off :password in the command and it will prompt you for your password.
YourDatacenter will be the case sensitive datacenter name and /vm will always need to be there (it’s where VMs show up).
This will begin to start allowing you to browse to your VM paths.
Export OVFs
The command to actually export the OVFs should be executed from inside of the folder you want things saved to:
ovftool --noSSLVerify vi://gsowell@10.0.2.1:443/MNS/vm/Greg/ciq/Greg-rocky8 .
Notice in the command I followed the folder structure Greg/ciq, then added the name of my VM. At the very end of the command is a space and a period. If you leave off the period, it won’t do the export, so make sure “ .” is on the end.
Import OVFs
The command to import an OVF is as follows:
qm importovf <vid> <contained folder>/<name of vm>.ovf <proxmox storage location>
An example would be:
qm importovf 400 Greg-rocky8-to-9-conversion/Greg-rocky8-to-9-conversion.ovf local-lvm
Notice you have to specify a unique vid for each imported VM. You can look at the Proxmox interface to find the next one, or you can issue this CLI command and it will tell you what it is:
pvesh get /cluster/nextid
Conclusion Migrating from one product to another can feel impossible at times, but automation is here to be your secret super power. We are quickly becoming migration experts, and we’d love to assist your team with complete migrations that have automation leave behinds… or we can also just do validation; as much or as little as you require.
As always, I appreciate you reading through, and would love your feedback.
Thanks and happy migrating!
Built for Scale. Chosen by the World’s Best.
1.4M+
Rocky Linux instances
Being used world wide
90%
Of fortune 100 companies
Use CIQ supported technologies
250k
Avg. monthly downloads
Rocky Linux


