5 min read
Running a W&B Hyperparameter Sweep Agent from an Apptainer

Apptainer is the most popular container solution for HPC. It has great integration with common specialized HPC hardware/software like GPU devices and MPI software stacks, and the containerized model it brings adds security and reproducibility that make it ideal for deployment in a multi-user HPC cluster environment. One major use case for Apptainer is in AI, where it makes the task of packaging together all the parts necessary for operations like AI training easy. This can include a programming language like Python or Julia, AI frameworks like PyTorch, TensorFlow, or Jax, or toolkits for doing GPU acceleration like CUDA or ROCm, etc.
Weights & Biases is a widely used MLOps platform that integrates a number of different capabilities into a single website. One of these is the ability to manage hyperparameter tuning sweeps, done to determine the optimal hyperparameters for model training. Hyperparameter sweeps through W&B are done by installing their sweep agent tooling onto a host and running the sweep from there. This will then cause the host to show up in the W&B web interface as W&B starts to send it sets of hyperparameters to check. This is a computationally intensive task, and can benefit from running across multiple hosts at once, as adding more sweep agent hosts just increases the number of hyperparameter sets that can be checked at once.
It could thus be useful to install the W&B tooling inside of an Apptainer to create a portable sweep agent runner that could be easily deployed to multiple hosts at once. To do this, we’ll start with the following Apptainer definition:
Bootstrap: docker
From: nvidia/cuda:11.5.0-cudnn8-devel-rockylinux8

%post

   dnf -y update

   dnf -y install python3

   python3 -m pip install --upgrade pip

   python3 -m pip install wandb
The first two lines:
Bootstrap: docker
From: nvidia/cuda:11.5.0-cudnn8-devel-rockylinux8
We indicate we want to start with the base container from the Docker Hub, namely, one from the NVIDIA set of containers that includes both CUDA and cuDNN, on a Rocky Linux 8 base. We do this so that any CUDA tooling we need in order to run our sweep agent on a GPU comes preinstalled.
The next section is the %post section, where any commands we want to run on the base image to add additional applications, software, tooling, etc. can be added so they’re run during the Apptainer build.
%post
dnf -y update

   dnf -y install python3 python3-devel

   python3 -m pip install --upgrade pip
Here, we first update the container’s installed packages with dnf, install Python 3, and update the installation of pip that the default Python 3 interpreter comes with. If you wanted to install a different version of Python 3, you could do so here right after the dnf update, and change all the subsequent python3 commands to match the command of the new version you installed.
python3 -m pip install wandb
We then install the wandb package with pip, which gives us the commands and tooling necessary to run a sweep agent. From here, in absence of needing any other tooling in our container, we could start our build and get to using our container. However, if you wanted to install anything else into this container, like PyTorch or similar packages that your code needs in order to run, you could install those packages in the usual way like:
python3 -m pip install -r ./requirements.txt
Or:
python3 -m pip install torch ...
We’ll save the full definition above to a file on our Linux system and then use the Apptainer runtime to build the container. If you don’t have the Apptainer runtime installed in your environment, either install the latest release for your distro from https://github.com/apptainer/apptainer/releases, or contact your system administrator to get it installed on your cluster system.
Once we’ve saved the container as a .def file (the standard file format for Apptainer definition files), we’ll go ahead and build it as mentioned:
$ apptainer build --nv sweep-agent.sif sweep-agent.def
We’re saving the container here in the .sif format, which represents the Singularity Image Format file format that Apptainer uses for its containers. The names are arbitrary but file extensions should match, as the format here is apptainer build –nv <destination .sif> <source .def>. We include the --nv option so the container is built against the system’s GPU drivers, assuming they are present and the correct version the container will need to run on the compute nodes. If the container builds correctly, you should get no Python errors on the package install, or similarly throughout the build commands. This output indicated that you’ve reached the end successfully and your container has been built:
INFO: Creating SIF file...
INFO: Build complete: sweep-agent.sif
Once the container is built, we can either run it directly on the host we built it on if it’s suitable, or move it to an HPC resource. In either case, we can first create our new sweep using the W&B tooling inside of the container. We’ll add our W&B API key to our compute host environment, as environmental variables exported in this manner on the host are added to the Apptainer environment when something is run inside of it:
$ export WANDB_API_KEY=<your W&B API key>
WANDB_API_KEY is a specific W&B environmental variable that the W&B tooling will look for in order to get an API key. This is the key you get at the project quickstart screen, marked in orange with “Your API key…”:
The actual key in this example is blanked out. You can also simply paste the key in when prompted during the below commands, but using this environmental variable eliminates that requirement.
Once we have this API key set up, we can use the container to create our sweep ID from a given project configuration. Navigate to the directory, codebase, or other structure you would run your wandb sweep
$ apptainer exec sweep-agent.sif wandb sweep <path to your sweep configuration YAML>
You should get the expected sweep configuration startup message:
wandb: Creating sweep from: <sweep configuration YAML>
wandb: Created sweep with ID: <sweep ID>
wandb: View sweep at: https://wandb.ai/<link to sweep>
wandb: Run sweep agent with: wandb agent <agent run link>
Once you have your compute resources ready and the container available to them, you can run the sweep agent from the container with:
$ apptainer exec --nv sweep-agent.sif wandb agent <agent run link>
The sweep agent should start, and if the underlying compute host is properly configured, will begin to utilize its resources to run the sweep. We again include the --nv option to utilize GPU resources if they're present, omit this if not. We can see the output printing on the command line as we expect:
wandb: Starting wandb agent 🕵️
2023-04-24 21:24:50,740 - wandb.wandb_agent - INFO - Running runs: []
2023-04-24 21:24:51,133 - wandb.wandb_agent - INFO - Agent received command: run
2023-04-24 21:24:51,133 - wandb.wandb_agent - INFO - Agent starting run with config:
...
And from there, you should be able to see sweeps completing both on the command line:
...
2023-04-28 19:52:41,066 - wandb.wandb_agent - INFO - Running runs: ['i9f55k2t']
Global seed set to 123
...
2023-04-28 19:52:41,067 - wandb.wandb_agent - INFO - Cleaning up finished run: i9f55k2t
…
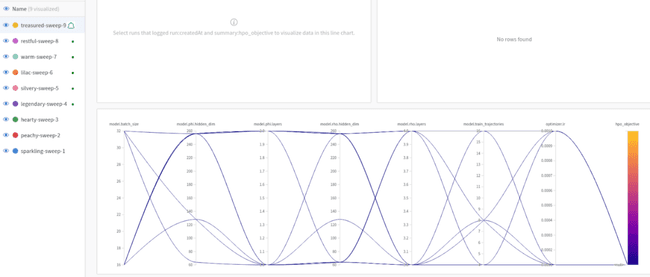
wandb: View run treasured-sweep-9 at: https://wandb.ai/.../runs/
i9f55k2t
wandb: Synced 6 W&B file(s), 1 media file(s), 1 artifact file(s) and 0 other file(s)
...
And through the W&B web interface:
To scale out with more sweep agents, simply run the exec command above on additional compute hosts in an embarrassingly parallel manner, as adding more sweep agents simply increases the number of hyperparameter sets you can check at once.
Keep an eye out for future articles from CIQ on modern HPC with Apptainer!
Built for Scale. Chosen by the World’s Best.
1.4M+
Rocky Linux instances
Being used world wide
90%
Of fortune 100 companies
Use CIQ supported technologies
250k
Avg. monthly downloads
Rocky Linux


