4 min read
Mountain V2 Upgrade Via Ansible CLI

We’re happy to announce Mountain V2, with a new backend that is going to allow for new and awesome features! It also brings along additional security features like two-factor authentication (2FA).
In order to achieve these awesome new features we need to: setup 2FA in Mountain V2, create new authentication keys for our products, and use Ansible to upgrade existing servers configured for Mountain V1 (this does all of the heavy lifting for us).
Keep reading for a step-by-step guide to upgrading via Ansible from Mountain V1 to V2.
Demo video
Get Mountain access key
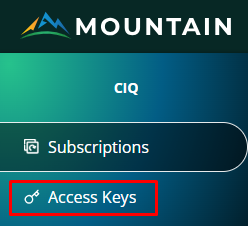
Once you have setup your 2FA with Okta, browse to https://secure.ciq.com.
From here, click on the “Access Keys” option on the left:
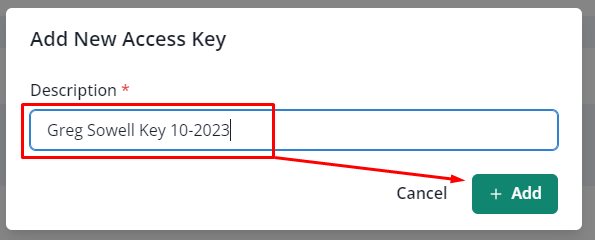
From here, click on “Add Access Key” in the upper right corner:

Now, give your key a useful “Description” and click “Add”:
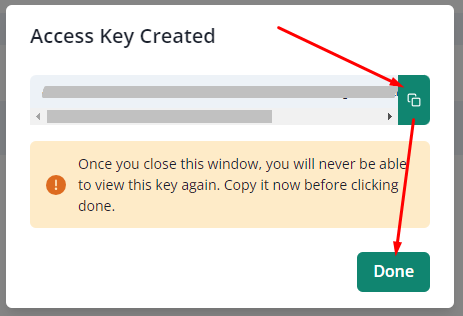
The “Access Key Created” menu will pop up. This is your one chance to copy and save this key, so be sure to grab it, and then place it in your secure key vault (we’ll need this later in the process). Once done, click “Done” to close this window:
Install Ansible CLI
I’m going to quickly install Ansible CLI via the Python pip3 command (Ansible is all written in Python). I’m going to do this from a VM that isn’t one of the servers needing migration (the server only needs SSH access to the hosts in question).
I’ll first make sure python3 pip (install tool for Python), and sshpass for ssh access are installed:
sudo dnf install python3 python3-pip sshpass -y
I’ll now use the pip tool to install Ansible:
sudo pip3 install ansible
You should now be able to run a quick version check to make sure everything installed correctly:
ansible --version
ansible [core 2.15.5]
Configure Ansible components
Ansible CLI (referred to as just Ansible moving forward) has a few required components to perform automation:
-
Inventory - list of hosts able to be automated against (example below)
-
Credentials - how to log into a server
-
Playbook - an automation script consumed by Ansible
- The playbook has its own section coming up next
Inventory
Ansible inventories can be either ini or yaml format. For this example, I’m going to do a quick/dirty ini-formatted inventory. I’m going to simply name the file “inventory.”
[mountain-hosts]
# example of a fully qualified domain host
webhost12.gregsowell.com

#example of a non FQDN host
#add the ansible_host variable to specify what IP address ansible should use to connect
webhost44 ansible_host=192.168.1.44

#example of using IP ranges
#this will attempt to connect to all hosts from 10.134.10.0 to 10.134.11.254
#this is a quick and dirty way to pull in a lot of hosts at once
10.134.1[0:1].[1:254]

#here’s an example of doing the same thing via hostnames
#This would be webserver001.gregsowell.com to webserver254.gregsowell.com
webserver[001:254].gregsowell.com

[mountain-hosts:vars]
#setup the username to be used to connect to hosts
#needs to be a user with sudo privileges
ansible_user=root

#you can set the password directly here, but I wouldn’t recommend it
#instead you can execute the playbook and prompt for password on the command line
#ansible_password=myPassword
Credentials
In the inventory above, I showed how you can specify the username and password to connect to hosts with. By default, if nothing is specified in the inventory or on the command line, it will attempt to connect as the user running the playbook. If the SSH private key for this user has the ability to connect to the remote hosts and has sudo privileges, it will do so.
I’m going to show using username in the inventory and prompt for password.
Acquire/configure Ansible files
My Mountain V2 upgrade playbook can be found here. You can either git clone the repo or just copy/paste the contents into your working directory.
Mountain access key variable
In the playbook, there is a variable that either needs to be set directly in the playbook or set via the extra-vars option on the CLI “mtn_access_key.”
In playbook:
mtn_access_key: xzy123
On CLI:
--extra-vars “mtn_access_key=xzy123”
Hosts
The hosts portion of the playbook designates which host or hosts inside of the inventory file should be automated against. In my inventory, I created the “mountain-hosts” group, so I’ve set my hosts portion in the playbook to the same:
hosts: mountain-hosts
ansible.cfg
In your working directory, create a file named ansible.cfg with the following contents:
[defaults]
host_key_checking = false
This allows for SSHing into hosts without host key checking.
Run upgrade playbook
The following command runs the playbook using our new inventory and with the ask-pass option to prompt for ssh password:
ansible-playbook -i inventory --ask-pass rocky-mtn-v2.yml
Notes
When running this playbook your old “/etc/yum.repos.d/ciq.repo” file will be removed and rebuilt. The playbook actually makes a backup copy of it for processing, but also for reference if you want to take a look at it. The new backup file is saved to “/etc/yum.repos.d/ciq.repo.old.”
Conclusion
Ansible, and this playbook, can really make the migration process easier, and we hope it helps you on the way to the new and improved Mountain!
Built for scale. Chosen by the world’s best.
2.75M+
Rocky Linux instances
Being used world wide
90%
Of fortune 100 companies
Use CIQ supported technologies
250k
Avg. monthly downloads
Rocky Linux


