2 min read
How to Set up a Web Server in Rocky Linux

Rocky Linux is an open source operating system that is ideal for so many server use cases. One very popular use for the OS is as a web server. The combination of Rocky Linux and Apache makes for an outstanding platform for serving up your company's websites, either internally or to the public at large.
You might think installing and configuring Rocky Linux as a web server would be challenging. It's not. In fact, setting up a web server with Rocky Linux is much easier than you might think. With just a few quick commands, you can have the server up and running in no time.
Let’s walk through the process of installing the Apache web server on Rocky Linux, and then how to serve up your first basic web page.
Requirements
To make this work, you will need a running instance of Rocky Linux and a user with sudo privileges. I'll demonstrate with Rocky Linux 9. Of course, if you plan on serving up websites to the public, you'll also need a domain pointing to your server (but that is beyond the scope of this tutorial). With those in hand, let's get to the installation.
Installing Apache on Rocky Linux
The first thing to do is log in to your instance of Rocky Linux. Before you install Apache, you should probably update everything, which can be accomplished with the command:
sudo dnf update -y
If the kernel is upgraded in the process, you'll want to reboot the machine. If this is a production machine, you should run the update during a time when the server can be rebooted without causing problems for your business.
Once the update completes, you can then install Apache with the command:
sudo dnf install httpd -y
When the installation completes, you'll want to start and enable the service with the command:
sudo systemctl enable --now httpd
Opening the Firewall
The next step is to open the firewall to allow traffic through the standard HTTP port, which can be done with the following command:
sudo firewall-cmd --add-service=http --permanent
Reload the firewall with the command:
sudo firewall-cmd --reload
If you plan to serve sites up via HTTPS, you'll want to also open port 443 with the command:
sudo firewall-cmd --add-service=https --permanent
Access the Default Apache Welcome Page
Open a web browser on a machine connected to your Local Area Network (LAN) and point it to http://SERVER (where SERVER is the IP address of your Rocky Linux machine) and you should see the Apache default Welcome Page (Figure 1).
Figure 1
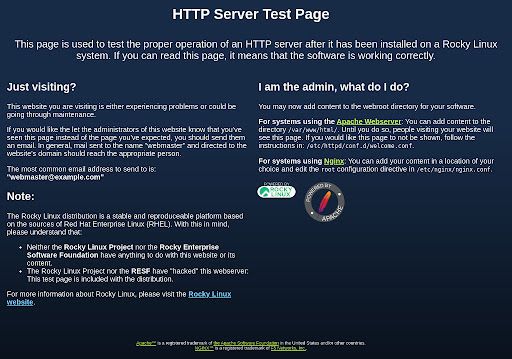
The default Apache Welcome Page is served up by Rocky Linux 9.
How to Add a Basic Web Page to Apache
The default Apache Welcome Page is a file, named welcome.conf and is found in /etc/httpd/conf.d/. The welcome.conf file will be served up until you create an index.html file in the Apache document root, which is /var/www/html/.
First, let’s make sure nano is installed with:
sudo dnf install nano -y
Now, let's create a basic index page with the command:
sudo nano /var/www/html/index.html
In that file, paste the following contents:
<!doctype html>
<html>
<head>
    <title>Welcome to my web page!</title>
  </head>
  <body>
    <p>This page is being served up by Apache and Rocky Linux.</p>
  </body>
</html>
Save and close the file with the key combination [Ctrl]+[X]. If you refresh the page in your web browser, you'll now see the text "This page is being served up by Apache and Rocky Linux."
As Simple as It Gets
And that is how you set up a basic web server with Rocky Linux. The next time we visit this subject, we'll talk about serving up multiple sites with Apache and virtual hosts.
Built for scale. Chosen by the world’s best.
2.75M+
Rocky Linux instances
Being used world wide
90%
Of fortune 100 companies
Use CIQ supported technologies
250k
Avg. monthly downloads
Rocky Linux


