
How to Set a Static IP Address in Rocky Linux Using the GUI
Rocky Linux is a powerful, open source operating system built for servers that can help power businesses of all sizes. Rocky Linux can be installed as either a command-line-only OS or a default GUI that can help make using Linux a bit easier (especially for those who are only now taking their first steps with the operating system).
The default desktop environment installed with Rocky Linux is GNOME, which includes plenty of tools to make your admin life a bit easier. Even before you get to the stage of configuring and using Rocky Linux, you first must install the operating system. During the installation, you have the option of configuring your networking settings. If you're like me, you often forget that option and have to deal with changing the network configuration from DHCP to Static post-install. Fortunately, with the help of the GNOME desktop, Rocky Linux makes this task quite simple.
Let me show you how it's done.
Requirements
The only thing you'll need for this is a running instance of Rocky Linux. I'll demonstrate using Rocky Linux 9 as a VirtualBox virtual machine. If you're deploying Rocky Linux as a VM, you'll want to make sure to set the network as Bridged, so Rocky Linux can be reached from your LAN.
I'll demonstrate how to configure a static IPv4 address. You can also configure an IPv6 address following these same steps.
If you've been running the server with a dynamically set IP address, you won't want to use that same address, because that can cause issues later should the DHCP server assign that same address to another device. Although this is beyond the scope of what we're discussing, make sure you know the DHCP range of addresses that are assigned and use an IP address outside of that range.
To find out what the current address has been assigned to the server, open a terminal window and issue the command:
ip a
You should see the IP address listed. Make note of that so you know what address the DHCP server handed out. If you do not know the range of DHCP addresses that are used, either contact your network admin or log into the route or server that assigns addresses and gather that information.
With that information at the ready, let's set a static IP address.
Setting the Static IP
Login to your Rocky Linux desktop and click the network icon in the upper-right corner. From that popup menu, click Wired Connected and then click Wired Settings (Figure 1).
Figure 1
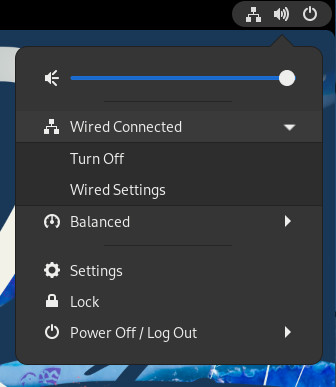
The GNOME Wired Connected menu is where Wired Settings is accessed.
At the top of the resulting window (Figure 2), you'll see the Network entry, which will automatically be selected. In the right pane, click the Gear icon associated with Wired.
Figure 2
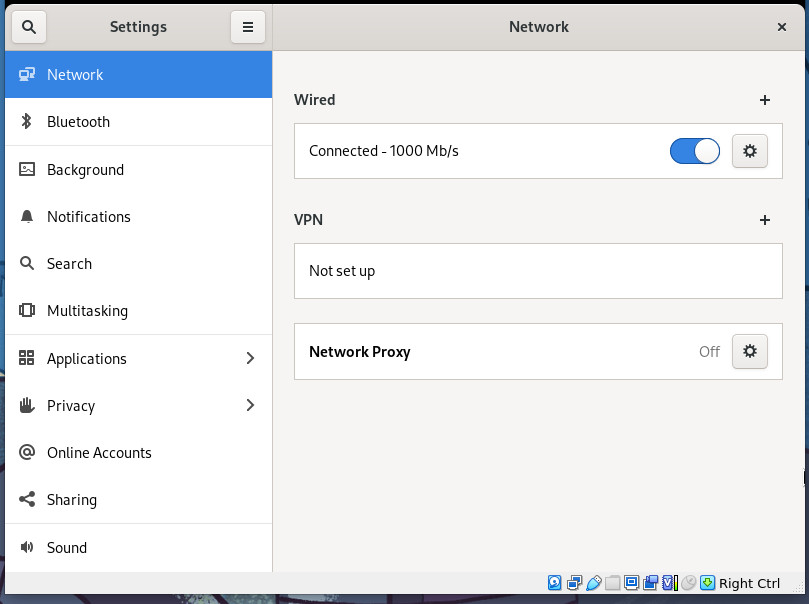
The Network Settings section in the GNOME Settings app.
In the next window, click the IPv4 tab and select Manual in the IPv4 Method section. You then must type the IP Address, Netmask, and Gateway addresses for the machine (Figure 3).
Figure 3

The IPv4 configuration tab in the GNOME Network Manager tool.
If you want to use specific DNS servers, make sure to move the Automatic slider for DNS to the OFF position and then type a comma-separated list of the DNS servers you want to use.
After taking care of those options, click Apply, which will save the settings and dismiss the window.
Once you've taken care of configuring the static IP address, you'll be back at the Network section of the Settings tool. At this time, the settings have not been applied. In order to apply the settings to the current session, you must click the ON/OFF slider for the Wired connection to the OFF position and then back to ON. This will apply the new settings for the wired connection. You can issue the ip a command to verify the changes have taken effect.
And that's all there is to configure a static IP address in Rocky Linux, using the GNOME GUI.


Built for scale. Chosen by the world’s best.
2.75M+
Rocky Linux instances
Being used world wide
90%
Of fortune 100 companies
Use CIQ supported technologies
250k
Avg. monthly downloads
Rocky Linux