7 min read
Running Camry Impact Model Using Open Radioss and Apptainer

There is an older version of this article, which can be found here.
Altair Radioss is now available as an open source project! This is major news for the simulation community with many contributors already onboard with OpenRadioss. Moving into open source can speed collaborative efforts like containerizing the application and testing on a new operating system. That’s exactly what we at CIQ did within days of Altair’s announcement.
This article describes two things: (1) How to create an OpenRadioss Apptainer container image from a daily released repository and (2) How to run the 2012 Toyota Camry Detailed Finite Element Model Toyota Camry Impact Model in LS-DYNA® format using the OpenRadioss Apptainer container. We tested these procedures on Rocky Linux 8.6 and 9.0.
Installation
The steps below has been tested and validated on Rocky Linux 8.6 and 9.0. If you are planning to try this out yourself, please make sure you have enough disk space. 80GB or above is recommended to test OpenRadioss examples.
Apptainer
The first step is to install Apptainer on Rocky Linux. Since the release of Apptainer version 1.1.0, the RPM package is merged into the upstream EPEL repository making installation and updating easier than ever
sudo dnf install -y epel-release
sudo dnf install -y apptainer
For alternate installation methods, check the Apptainer documentation.
Definition file
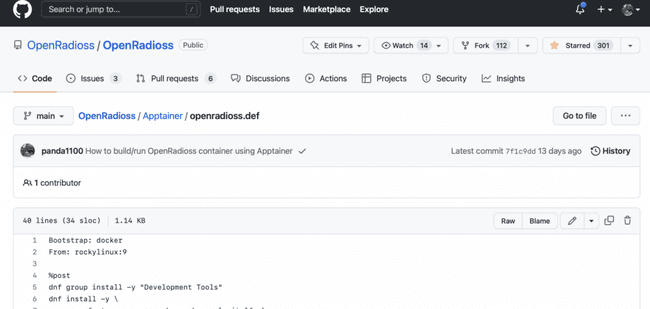
A definition file is like a set of blueprints for building a container. The OpenRadioss definition file sets up a base container and then pulls in the necessary tools and libraries, grabs the OpenRadioss source code from the main branch that is available on OpenRadioss GitHub repository, builds it, and sets the proper runtime environment.
The Apptainer definition file for the OpenRadioss container is merged into OpenRadioss GitHub repository. Let’s clone the OpenRadioss repository to build OpenRadioss container.
git clone https://github.com/OpenRadioss/OpenRadioss.git cd OpenRadioss/Apptainer/
Note: This definition file will build a container from the latest code in the main branch. If you want to “freeze“ the build on a specific commit to make it more reproducible, you could do something like the following.
sed -ri 's/ --depth 1//' openradioss.def
COMMIT=$(git rev-parse --short HEAD)
sed -i "/cd \/opt\/OpenRadioss\/starter/a git checkout $COMMIT" openradioss.def
The first sed command removes the --depth 1 option from the git clone _command so that you can access all of the commits. The next two commands add a line to the def file to check out the current commit. Now future builds based on this definition file will build from the same commit for a more reproducible experience.
Of course you should skip these lines if you want to build from the latest commit. )_
Build an OpenRadioss Apptainer image (SIF format)
Now we can build the OpenRadioss main Apptainer image with the following command without root privilege. It is a recommended best security practice to build containers without elevated privileges.
Note: If your system /tmp directory has limited space (ex. less than 5 or 10GB) or if you receive a warning that the 'nodev' mount option set on /tmp , please execute export APPTAINER_TMPDIR=/var/tmp before executing the apptainer build command. If your system has insufficient space on /var, please execute mkdir $HOME/tmp; export APPTAINER_TMPDIR=$HOME/tmp or similar.)
Build the OpenRadioss container with the following command.
apptainer build --fakeroot openradioss.sif openradioss.def
Copy this Apptainer image to somewhere in your PATH
mkdir -p ~/bin

cp openradioss.sif ~/bin
Note: If you use Debian-based distribution, please execute:
export PATH=~/bin:$PATH
mkdir -p ~/bin
cp openradioss.sif ~/bin
Containerized! We’re ready to utilize OpenRadioss using this openradioss.sif Apptainer image on your compute resources. This can run on your laptop, workstation, on-prem HPC cluster, and cloud resources.
We have recorded webinar for this procedures.
-
YouTube: Radioss (Altair open source project)
-
LinkedIn: https://lnkd.in/gYdtU5cC
MPI
Before running a model, install OpenMPI on the system if it’s not already installed.
sudo dnf install -y openmpi numactl hwloc
Close your terminal, then open the terminal again to apply the changes. Now you can load the OpenMPI module using the module command.
Set the following OpenMPI runtime configuration.
mkdir -p ~/.openmpi
echo "btl_vader_single_copy_mechanism=none" >> ~/.openmpi/mca-params.conf
Side note: without above cofiguration you will get following error with rootless build of Apptainer image. For more details please consult Vader in a Docker Container · Issue #4948 · open-mpi/ompi)
WARNING: The default btl_vader_single_copy_mechanism CMA is not available due to different user namespaces.

The vader shared memory BTL will fall back on another single-copy mechanism if one is available. This may result in lower performance.
Simulation setup
Now that we have the container, we want to test it with the Toyota Camry workload. This is a crash simulation, and we will use ParaView to visualize the result.
Download the 2012 Toyota Camry Impact Model in LS-DYNA® format
Download the model from CCSA, download the OpenRadioss launch file for this simulation. Please see details about OpenRadioss launch file here.
wget https://media.ccsa.gmu.edu/model/2012-toyota-camry-detailed-v5a.zip
unzip 2012-toyota-camry-detailed-v5a.zip
cd 2012-toyota-camry-detailed-v5a
wget -O CamryOpenRadioss.key https://openradioss.atlassian.net/wiki/download/attachments/10518559/CamryOpenRadioss.key?api=
Running OpenRadioss using MPI
Go to the model directory and then load OpenMPI module.
cd 2012-toyota-camry-detailed-v5a/
module load mpi/openmpi-x86_64
Run starter first. This pre-processing tool reads the data, initializes the simulation, checks the model, decomposes the domain for parallel processing and outputs simulation configuration and restart files. Make sure to set the -np parameter for the number of processors you will use in the second step below.
openradioss.sif starter_linux64_gf -i CamryOpenRadioss.key -np 8
And then, run engine that is actual solver using OpenMPI. Here we specify 8 MPI processes to run this simulation. This takes about 15 hours with “12th Gen Intel(R) Core(TM) i7-12700” and consumes about 13GB memory. For storage, at least 80GB of storage (SSD/HDD) is recommended to build and run this simulation.
mpirun -np 8 openradioss.sif engine_linux64_gf_ompi -i CamryOpenRadioss_0001.rad
Output
If it runs successfully, it will shows you NORMAL TERMINATION.
ELAPSED TIME = 80054.69 s             22:14:14
ESTIMATED SPEEDUP= 7.95
NORMAL TERMINATION
TOTAL NUMBER OF CYCLES : 172244
Post-processing using ParaView
Now we want to see our results using ParaView. The Toyota Camry simulation output files are in ANIM format. We need to convert them to VTK format and install ParaView.
Convert output files ANIM to VTK format
To visualize ANIM format with ParaView, we need to convert ANIM format to VTK format. The main OpenRadioss includes a converter utility anim_to_vtk inside tools directory.
A directory listing shows we have 25 output files from our simulation to convert, and each file has a three digit number, from 001 to 025, at the end of the name.
$ ls CamryOpenRadiossA* CamryOpenRadiossA001 CamryOpenRadiossA005 CamryOpenRadiossA009 CamryOpenRadiosA013 CamryOpenRadiossA017 CamryOpenRadiossA021 CamryOpenRadiossA025 CamryOpenRadiossA002 CamryOpenRadiossA006 CamryOpenRadiossA010 CamryOpenRadiosA014 CamryOpenRadiossA018 CamryOpenRadiossA022 CamryOpenRadiossA003 CamryOpenRadiossA007 CamryOpenRadiossA011 CamryOpenRadiosA015 CamryOpenRadiossA019 CamryOpenRadiossA023 CamryOpenRadiossA004 CamryOpenRadiossA008 CamryOpenRadiossA012 CamryOpenRadiosA016 CamryOpenRadiossA020 CamryOpenRadiossA024
The following command will convert all 25 files from ANIM format to VTK format.
$ seq -f CamryOpenRadiossA%03g 025 | xargs -L 1 -I{} sh -c 'openradioss.sif anim_to_vtk_linux64_gf "$1" > "$1.vtk"' -- {}
Now our directory listing shows our simulation results in VTK format ready to rendering by ParaView.
$ ls CamryOpenRadiossA*.vtk CamryOpenRadiossA001.vtk CamryOpenRadiossA006.vtk CamryOpenRadiossA011.vtk CamryOpenRadiossA016.vtk CamryOpenRadiossA021.vtk CamryOpenRadiossA002.vtk CamryOpenRadiossA007.vtk CamryOpenRadiossA012.vtk CamryOpenRadiossA017.vtk CamryOpenRadiossA022.vtk CamryOpenRadiossA003.vtk CamryOpenRadiossA008.vtk CamryOpenRadiossA013.vtk CamryOpenRadiossA018.vtk CamryOpenRadiossA023.vtk CamryOpenRadiossA004.vtk CamryOpenRadiossA009.vtk CamryOpenRadiossA014.vtk CamryOpenRadiossA019.vtk CamryOpenRadiossA024.vtk CamryOpenRadiossA005.vtk CamryOpenRadiossA010.vtk CamryOpenRadiossA015.vtk CamryOpenRadiossA020.vtk CamryOpenRadiossA025.vtk
Install ParaView
Download ParaView from their official website and place it to your preferred location.
$ wget -O ParaView-5.10.1-MPI-Linux-Python3.9-x86_64.tar.gz "https://www.paraview.org/paraview-downloads/download.php?submit=Download&version=v5.10&type=binary&os=Linux&downloadFile=ParaView-5.10.1-MPI-Linux-Python3.9-x86_64.tar.gz"

$ tar zxvf ParaView-5.10.1-MPI-Linux-Python3.9-x86_64.tar.gz

$ sudo mkdir -p /opt/ParaView 4$ sudo mv ParaView-5.10.1-MPI-Linux-Python3.9-x86_64 /opt/ParaView/5.10.1
$ rm -rf ParaView-5.10.1-MPI-Linux-Python3.9-x86_64.tar.gz
$ export PATH=/opt/ParaView/5.10.1/bin:$PATH
$ export LD_LIBRARY_PATH=/opt/ParaView/5.10.1/lib:$LD_LIBRARY_PATH
Rendering the results
To visualize our results, simply call ParaView providing it which file to render. Here is the command and resulting visualization for CamryOpenRadiossA010.vtk
$ paraview --data=CamryOpenRadiossA010.vtk
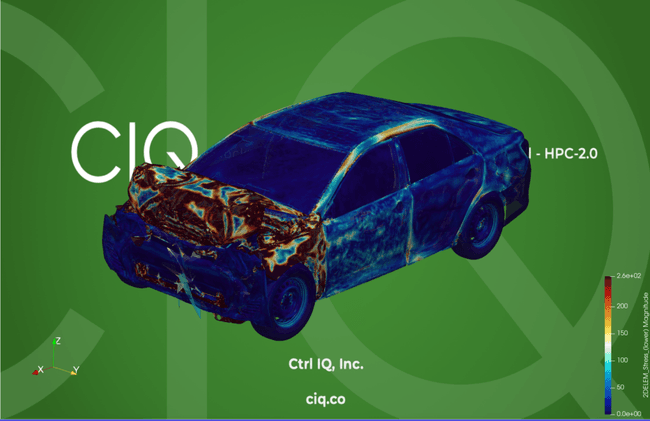
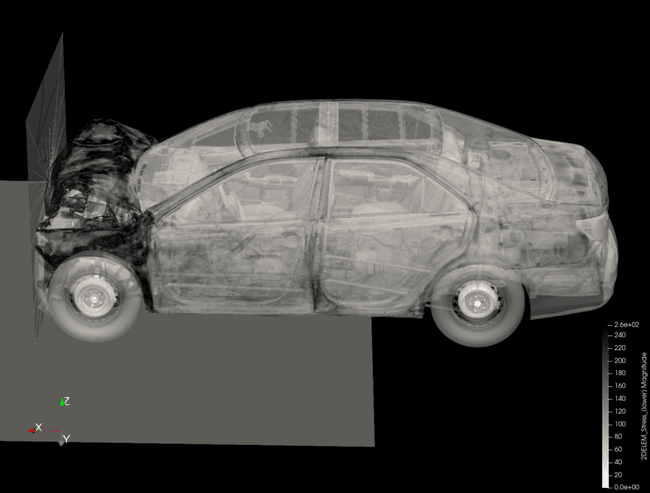
The pictures below are shown stress magnitude. The both images are rendering of CamryOpenRadiossA010.vtk. The result shows most of the stress absorbed at front end and much less at passenger cabin.
Built for Scale. Chosen by the World’s Best.
1.4M+
Rocky Linux instances
Being used world wide
90%
Of fortune 100 companies
Use CIQ supported technologies
250k
Avg. monthly downloads
Rocky Linux
