7 min read
Deploying a Dell PowerEdge and Cornelis Omni-Path Cluster with Warewulf

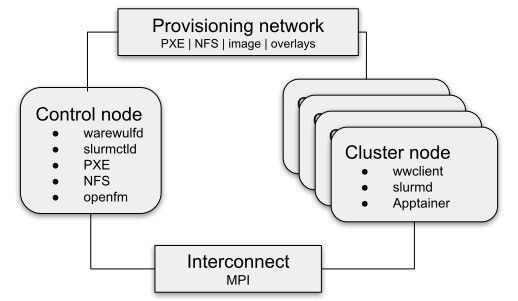
CIQ develops and supports open source software for HPC that simplifies your life as a cluster administrator. I recently had the opportunity to deploy and test this software in a Dell PowerEdge cluster with Cornelis Omni-Path networking, with equipment provided in generous partnership by Dell and Cornelis. Both PowerEdge and Omni-Path are frequently deployed in the HPC space due to their performance, reliability, and cost-effectiveness, so they provide a good platform to showcase how Warewulf makes it easy to deploy a cohesive HPC cluster at any scale.
Setting up the control node
The control node is a Dell PowerEdge R6525 equipped with 2x AMD EPYC 73F3 CPUs, 512GiB system memory, and a 100Gb Cornelis Omni-Path HFI. In this cluster, it runs the Warewulf server, fabric manager, and Slurm controller, starting from a Rocky Linux 8.6 base.
Installing Warewulf
Installing Warewulf v4 on the control node is a simple three-step process:
-
Install the Warewulf package.
-
Update the Warewulf configuration file.
-
Direct Warewulf to configure the system.
# dnf install https://github.com/hpcng/warewulf/releases/download/v4.4.1/warewulf-4.4.1-1.git_d6f6fed.el8.x86_64.rpm
# vi /etc/warewulf/warewulf.conf
# wwctl configure -a
Most of the work in that process goes into the configuration file; but, even then, there’s not much that is required. For reference, here’s the entirety of our warewulf.conf:
WW_INTERNAL: 43
ipaddr: 10.10.10.30
netmask: 255.255.255.0
network: 10.10.10.0
warewulf:
  port: 9873
  secure: false
  update interval: 60
  autobuild overlays: true
  host overlay: true
  syslog: false
dhcp:
  enabled: true
  template: default
  range start: 10.10.10.200
  range end: 10.10.10.209
  systemd name: dhcpd
tftp:
  enabled: true
  systemd name: tftp
nfs:
  enabled: true
  export paths:
path: /home
    export options: rw,sync
    mount options: defaults
    mount: true
path: /opt
    export options: ro,sync,no_root_squash
    mount options: defaults
    mount: true
The first step is to define ipaddr, netmask, and network. These three parameters configure the network for the control node itself and define the network and network interface that Warewulf uses to provision the cluster nodes.
Also important is dhcp range start and range end. These define the addresses that Warewulf uses during PXE provisioning. (Of particular note: these are not the addresses used by cluster nodes after they have been provisioned: nodes only use addresses from this range when they are downloading their node image.)
The Warewulf configuration file enables dhcp, tftp, and nfs by default, and we use these default settings in this test cluster. These services are then automatically configured by Warewulf using wwctl configure -a.
The fabric manager
The control and cluster nodes are connected via a single externally-managed 24-port Omni-Path 100 switch, and the control node serves as the fabric manager for the OPA network.
The OPA fabric manager software is available as a standard part of Rocky Linux.
# dnf install opa-fm
# systemctl enable –now opafm
# systemctl status opafm opa-basic-tools
# opainfo
hfi1_0:1                           PortGID:0xfe80000000000000:001175010178e59f
   PortState:     Active
   LinkSpeed      Act: 25Gb         En: 25Gb
   LinkWidth      Act: 4            En: 4
   LinkWidthDnGrd ActTx: 4  Rx: 4   En: 3,4
   LCRC           Act: 14-bit       En: 14-bit,16-bit,48-bit       Mgmt: True
   LID: 0x00000001-0x00000001       SM LID: 0x00000001 SL: 0
         QSFP Copper,       3m  Hitachi Metals    P/N IQSFP26C-30       Rev 02
   Xmit Data:               2658 MB Pkts:             15940870
   Recv Data:              11217 MB Pkts:             15170908
   Link Quality: 5 (Excellent)
Configuring Slurm
The control node is also running a Slurm controller from packages provided by OpenHPC.
# dnf install http://repos.openhpc.community/OpenHPC/2/CentOS_8/x86_64/ohpc-release-2-1.el8.x86_64.rpm
# dnf install slurm-slurmctld-ohpc
# cp /etc/slurm/slurm.conf{.example,}
# vi /etc/slurm/slurm.conf
# systemctl enable --now slurmctld munge
# scontrol ping
Slurmctld(primary) at admin1.dell-ciq.lan is UP
Configuring Slurm is somewhat out-of-scope for this article, but let’s go over some of the most pertinent directives for this deployment:
NodeName=c[5-8] Sockets=2 CoresPerSocket=64 ThreadsPerCore=1
PartitionName=opa Nodes=c[5-8] MaxTime=24:00:00 State=UP Oversubscribe=EXCLUSIVE
SlurmctldParameters=enable_configless
We’ve defined our four nodes, c[5-8] in Slurm, along with their basic CPU information. These four nodes are added to an opa partition that we can support jobs to. Finally, slurmctld itself is configured to enable “configless” mode, which allows compute nodes to get slurm.conf from the controller when they first connect, without having to distribute the config file to all nodes manually.
Compute nodes
The four compute nodes are a Dell PowerEdge C6525 multi-node server. Each node is equipped with 2x AMD EPYC 7702 CPUs, 256GiB system memory, and a 100Gb Cornelis Omni-Path HFI.
Adding compute nodes to Warewulf
Adding compute nodes to Warewulf is relatively straightforward. Our four nodes are named c[5-8], and each has an IP address for its default interface, its IPMI interface, and its OPA interface. Settings that are the same across all nodes, such as netmask, gateway, and IPMI credentials, are added to the default node profile.
# wwctl node add c5 --discoverable=yes --ipaddr=10.10.10.41 --ipmiaddr=172.29.235.41
# wwctl node add c6 --discoverable=yes --ipaddr=10.10.10.42 --ipmiaddr=172.29.235.42
# wwctl node add c7 --discoverable=yes --ipaddr=10.10.10.43 --ipmiaddr=172.29.235.43
# wwctl node add c8 --discoverable=yes --ipaddr=10.10.10.44 --ipmiaddr=172.29.235.44

# wwctl node set c5 --netname=opa --ipaddr=10.10.12.41
# wwctl node set c6 --netname=opa --ipaddr=10.10.12.42
# wwctl node set c7 --netname=opa --ipaddr=10.10.12.43
# wwctl node set c8 --netname=opa --ipaddr=10.10.12.44

# wwctl profile set default \
> --netmask=255.255.255.0 --gateway=10.10.10.30 \
> --ipmiuser=root --ipmipass=[redacted] \
> --ipminetmask=255.255.255.0 --ipmiinterface=lanplus

# wwctl profile set default --netname=opa --type=InfiniBand \
> --netdev=ib0 --onboot=true --netmask=255.255.255.0
Defining compute node images
One of the best features of Warewulf v4 is its support for OCI container images. This makes it near trivial to build and maintain compute node images for Warewulf clusters.
The compute node image in this environment is built on a community Warewulf Rocky Linux 8 image, and adds support for OpenHPC, Slurm, Apptainer, and OPA.
FROM ghcr.io/hpcng/warewulf-rockylinux:8.6

RUN dnf -y install \
      dnf-plugins-core \
      epel-release \
      http://repos.openhpc.community/OpenHPC/2/CentOS_8/$(uname -m)/ohpc-release-2-1.el8.$(uname -m).rpm \
    && dnf config-manager --set-enabled powertools \
    && dnf -y install \
         apptainer \
         ohpc-base-compute \
         ohpc-slurm-client \
         slurm-libpmi-ohpc \
         lmod-ohpc \
         chrony \
         opa-basic-tools \
         libpsm2 \
    && systemctl enable munge \
    && systemctl enable slurmd \
    && mkdir -p /var/spool/slurm \
    && dnf -y clean all
We could build and push this container to a registry to then import into Warewulf; but Warewulf can also import a saved OCI archive, which Podman can generate directly. Once the container is imported into Warewulf, we can set it as the container for the default node profile.
# podman build --tag compute-slurm-opa:latest compute-slurm-opa/
# podman save compute-slurm-opa:latest -o compute-slurm-opa.tar
# wwctl container import $(readlink -f compute-slurm-opa.tar) compute-slurm-opa
# wwctl profile set default --container=compute-slurm-opa
Overlays
We use a couple of overlays to customize the configuration of the cluster nodes. First, our slurm overlay captures distributes the munge key (used by Slurm for authentication within the cluster) and the defines the configuration server for slurmd.
# wwctl overlay create slurm
# wwctl overlay mkdir slurm /etc
# wwctl overlay mkdir slurm /etc/munge
# wwctl overlay mkdir slurm /etc/sysconfig
# wwctl overlay edit slurm /etc/sysconfig/slurmd
# wwctl overlay show slurm /etc/sysconfig/slurmd
SLURMD_OPTIONS="--conf-server admin1.dell-ciq.lan:6817"
# wwctl overlay import slurm /etc/munge/munge.key
# wwctl overlay list -a slurm
OVERLAY NAME                   FILES/DIRS
slurm                          /etc/
slurm                          /etc/munge/
slurm                          /etc/munge/munge.key
slurm                          /etc/sysconfig/
slurm                          /etc/sysconfig/slurmd
It’s important for cluster nodes to have synchronized time. Our chrony overlay configures compute nodes to synchronize time with the control node.
# wwctl overlay create chrony
# wwctl overlay import --parents chrony /etc/chrony.conf
# wwctl overlay edit chrony /etc/chrony.conf
# wwctl overlay show chrony /etc/chrony.conf | tail -n1
server admin1.dell-ciq.lan iburst
We add our newly-defined overlays to the default profile and rebuild overlays for the nodes.
# wwctl profile set default --wwinit wwinit,slurm,chrony
# wwctl overlay build
Booting the nodes
Since we configured IPMI when we added the nodes, we can use Warewulf’s IPMI support to power on our nodes remotely. Powering them on one-at-a-time ensures that node discovery correctly assigns the intended name to each discovered node.
# wwctl power on c5
# wwctl power on c6
# wwctl power on c7
# wwctl power on c8
Running a test application
In the end, we’re left with a working Slurm cluster, complete with the ability to run arbitrary containers directly from the internet with Apptainer!
$ srun --partition=opa apptainer run docker://alpine:latest sh -c 'echo $(hostname): Hello, world!'
INFO:    Using cached SIF image
c5: Hello, world!
Alternatively, OpenHPC packages can be installed on the control node and, since /opt is shared via NFS from the control node to cluster nodes, these packages are available at runtime through the lmod system.
$ srun --partition=opa sh -c 'module avail'

-------------------------- /opt/ohpc/pub/modulefiles ---------------------------
   cmake/3.24.2    hwloc/2.7.0         os            prun/2.2
   gnu9/9.4.0      libfabric/1.13.0    pmix/4.2.1    ucx/1.11.2

If the avail list is too long consider trying:

"module --default avail" or "ml -d av" to just list the default modules.
"module overview" or "ml ov" to display the number of modules for each name.

Use "module spider" to find all possible modules and extensions.
Use "module keyword key1 key2 ..." to search for all possible modules matching
any of the "keys".
Next steps
This article was originally meant to include a broad comparison of different MPI applications; but in the process of putting that together, I found a lot more interesting information than I wanted to just have here at the end. Be sure to read my next article, "Benchmarking Containerized MPI with Apptainer on Dell PowerEdge and Cornelis Omni-Path."
Built for scale. Chosen by the world’s best.
2.75M+
Rocky Linux instances
Being used world wide
90%
Of fortune 100 companies
Use CIQ supported technologies
250k
Avg. monthly downloads
Rocky Linux


