6 min read
Ascender Windows Quick Start Guide

Connecting Ascender and/or Ansible to a Windows host can seem a little obtuse at first, but the aim here is to get you up to speed with as few steps as possible. The demo will be showing a classic, pushing Windows updates, but with a twist; I’ll be creating a VMware snapshot first, performing updates; if it fails, it will rollback the snapshot (then delete it); if it succeeds, it will simply delete the snapshot and be done.
Video
https://youtu.be/2ANcQOwqXKk?feature=shared
Connecting To Windows Hosts
By default, Ansible assumes you will be connecting via SSH, and in our case, we want to utilize WinRM to connect to our Windows hosts. We can accomplish this by setting some key variables for the hosts (most often, this is done in the inventory under a group the server is a member of):
ansible_connection: winrm
Use winrm rather than the default SSH
ansible_port: 5985
By default WinRM uses ports 5986/HTTPS or 5985/HTTP
ansible_winrm_server_cert_validation: ignore
If using self signed certificates
ansible_winrm_transport: kerberos
Many choices for transport, specify chosen
ansible_winrm_kerberos_delegation: yes
When using kerberos allow delegation
In the above, ansible_connection and Ansible_winrm_server_cert_validation will generally be the same for everyone, but the others are variable. What you choose for transport often dictates the other options.
Using the HTTP port 5985 is usually just fine, as WinRM itself is encrypted.
As for Transport, there are multiple options, listed here:
Basic
- Not encrypted
NTLM
-
Enabled by default
-
Strong hash
-
Not as secure
Certificate
-
Very difficult to setup
-
Valid certs/CAs required
-
Certificate is based off user account
CredSSP
-
Supports Multi-Hop
-
Credentials delegation on remote machine
-
Utilizes TLS Tunnel / NTLM / Kerberos
Kerberos
-
Domain membership required
-
Kerberos tokens used for authentication
-
Supports Multi-hop when using delegation
Generally, NTLM and Kerberos are enabled by default. NTLM is often used to initially connect to and add a host to the domain. At this point, Kerberos is generally utilized, as it tends to be the most secure. If a host isn’t on a domain, CredSSP is most often used.
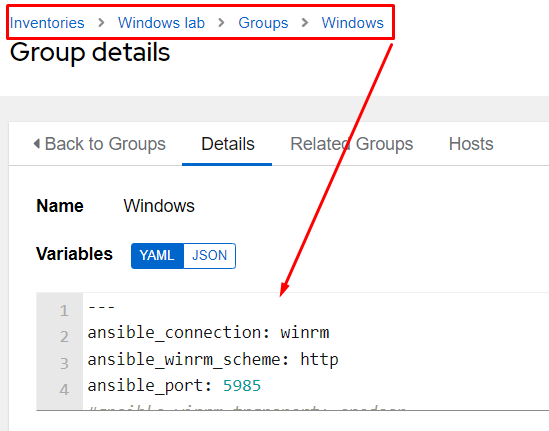
Here’s a screenshot of the settings added to a Windows group in Ascender:
Playbook
The playbook can be found here and is named win-updates.yml. I’ll break it into pieces for easier consumption:
---
- name: windows update in vmware with snapshots
  hosts: Greg-Win-IIS1
  gather_facts: false
  vars:
    vcenter_hostname: 10.1.2.3
    vcenter_username: "{{ gen1_user }}"
    vcenter_password: "{{ gen1_pword }}"
    datacenter_name: MNS
The above has gather_facts set to false. By default, it is enabled and will collect and variabilize information about the system for use in our automations. Since I’m not using any of that info, I turn it off to make the playbook run more efficiently.
After that, I have some “vars,” or variables. I tend to put all variables here, even if they will be overwritten by extra vars being passed in at execution time, just so it’s easier to see what’s available for change in the playbook.
  tasks:
  - name: create VM snapshot
    community.vmware.vmware_guest_snapshot:
      validate_certs: false
      hostname: "{{ vcenter_hostname }}"
      username: "{{ vcenter_username }}"
      password: "{{ vcenter_password }}"
      datacenter: "{{ datacenter_name }}"
      folder: "/Greg/ciq/"
      name: "{{ inventory_hostname }}"
      state: present
      snapshot_name: snap-update
      description: snapshot for updates
      memory_dump: true
    delegate_to: localhost

  - name: device in maint mode
    debug:
      msg: "Put {{ inventory_hostname }} into maint mode"
This begins the task section, where each task is a unique, discrete task to perform. I start by connecting to my VMware VCenter and performing a snapshot on the VM. The next task is a placeholder where I would put a task to call my monitoring system and put this host into maintenance mode.
  - name: perform update procedure in block
    block:
      - name: perform updates on the server
        ansible.windows.win_updates:
          category_names:
            - CriticalUpdates
#            - SecurityUpdates
#            - UpdateRollups
# setting the state to searched below is akin to "check" mode.  It only does a lookup.
          state: searched
        register: update_res

    rescue:
      - name: win update failed, so rollback the snapshot
        community.vmware.vmware_guest_snapshot:
          validate_certs: false
          hostname: "{{ vcenter_hostname }}"
          username: "{{ vcenter_username }}"
          password: "{{ vcenter_password }}"
          datacenter: "{{ datacenter_name }}"
          folder: "/Greg/ciq/"
          name: "{{ inventory_hostname }}"
          state: revert
          snapshot_name: snap-update
        delegate_to: localhost
The next two tasks live inside a block. A block is a convenient way to group certain tasks together. Here I’m first performing the Windows update, though I have the state set to “searched,” which essentially means that it will check and see what would be updated. I leave it in this mode for demo purposes. In production, I would actually apply updates.
The task under the rescue section is only run if the update task errors out. This means if the update fails, then we will call the rescue section and restore the snapshot we just took, thus restoring the server to working order!
  - name: Completed processing, delete snapshot
#    when: update_res.changed == true
    community.vmware.vmware_guest_snapshot:
      validate_certs: false
      hostname: "{{ vcenter_hostname }}"
      username: "{{ vcenter_username }}"
      password: "{{ vcenter_password }}"
      datacenter: "{{ datacenter_name }}"
      folder: "/Greg/ciq/"
      name: "{{ inventory_hostname }}"
      state: absent
      snapshot_name: snap-update
    delegate_to: localhost
    ignore_errors: true

  - name: device out maint mode
    debug:
      msg: "Remove {{ inventory_hostname }} from maint mode"
The last real task calls vmware and deletes the snapshot.
After that is a debug that is essentially a placeholder for removing this device from maintenance mode.
Ascender
Inventory
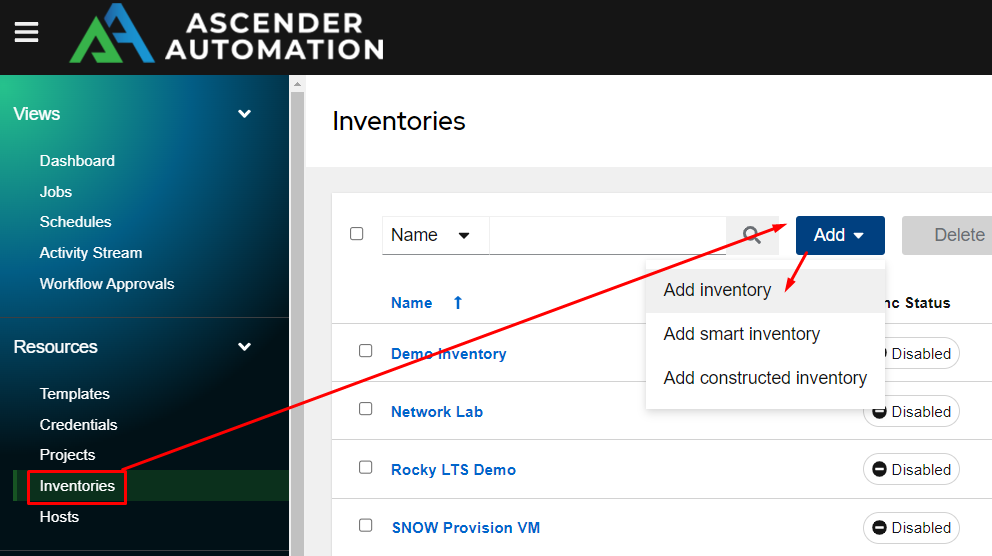
We start configuring Ascender by adding an inventory. This is done via inventories, clicking add, and choosing inventory:
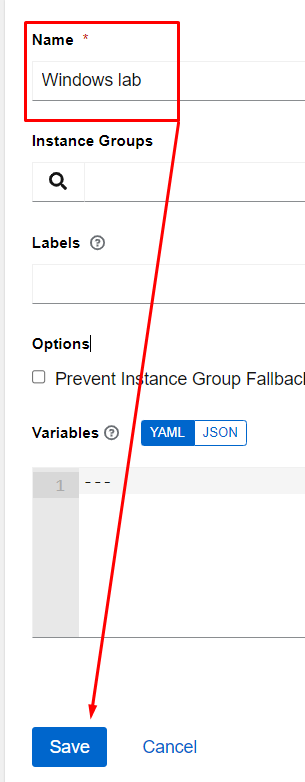
In here, I give the inventory a meaningful name and click save:
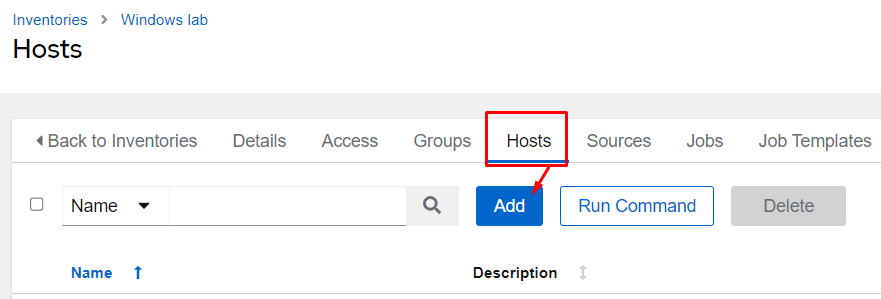
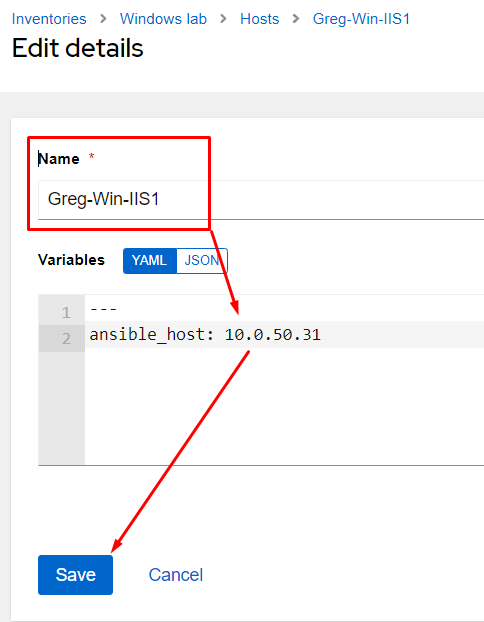
I now click on the hosts tab and then add a host:
From here, I fill in a meaningful name and then click save. If the name is a Fully Qualified Domain Name, then I’m done. In my case, it is not, so I add a special variable “ansible_host” that instructs Ansible to use the supplied IP address to connect to the host:
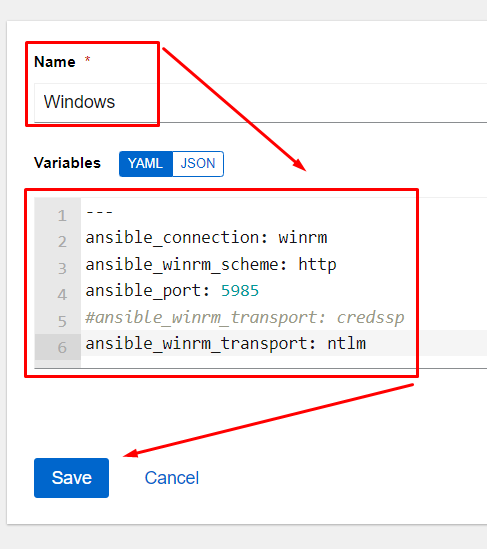
I’ll then create a group with the following variables:
---
ansible_connection: winrm
ansible_winrm_scheme: http
ansible_port: 5985
ansible_winrm_transport: ntlm
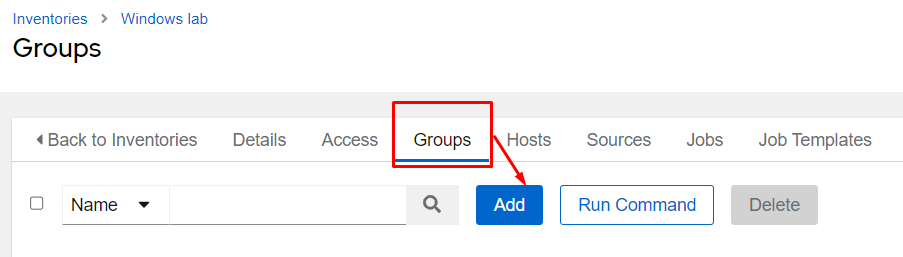
I’ll then go to the hosts tab inside the group and add my existing hosts:

Projects
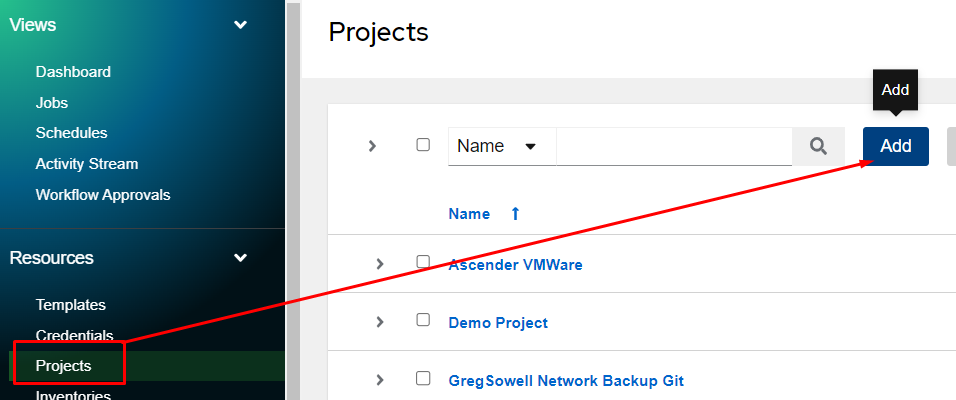
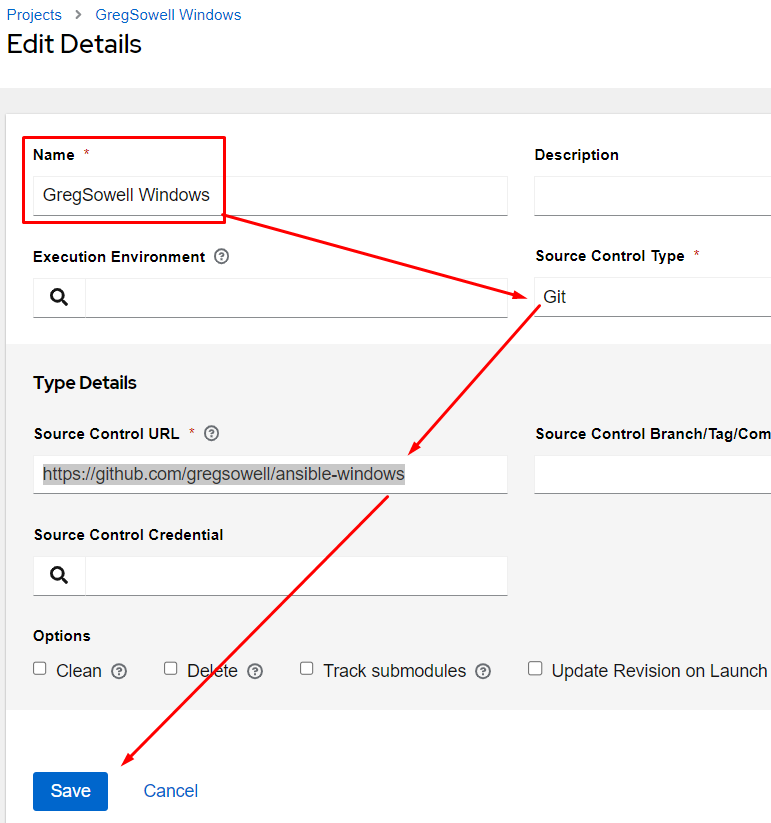
Now I’ll add my project. A project connects Ascender to a git repository to bring in your playbooks, templates, etc. Click on projects under the resource menu, then click add:
I give it a meaningful name, choose “git” as the “source control type,” put my repository in the “source control URL”(https://github.com/gregsowell/ansible-windows), and click save:
Credentials
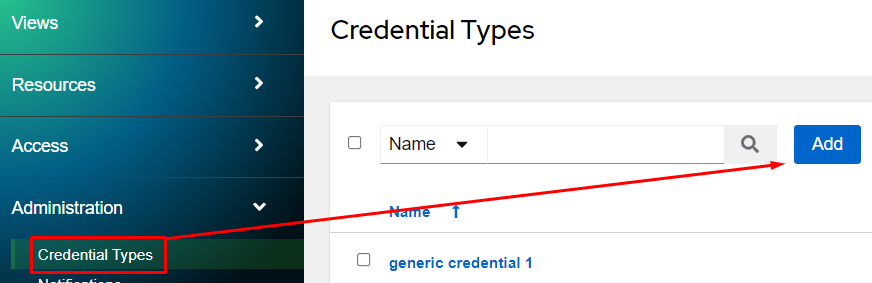
Next, I’m going to add some credentials, but first I need to create a custom credential. A custom credential gives me the ability to design a credential to collect and store any special information from a user in the credential section. I’ll do this by going to the administration menu, clicking on Credential Types, then adding:
I’m now creating what I call “generic credential 1”.
The input configuration is:
fields:- id: supp_gen1_user type: string label: Username - id: supp_gen1_pword type: string label: Password secret: truerequired: - supp_gen1_user - supp_gen1_pword
The injector configuration is:
extra_vars:
  gen1_user: '{{ supp_gen1_user }}'
  gen1_pword: '{{ supp_gen1_pword }}'
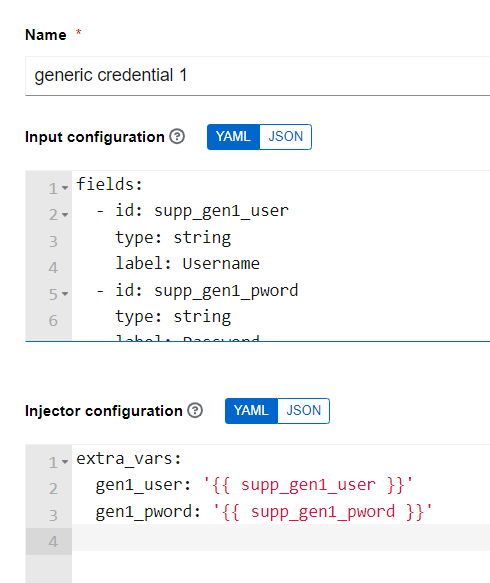
As you can see, I’m collecting a username and a password. I’ve designated the password as “secret” so that it will obfuscate the information. I then inject the credential as an extra variable at execution time; there are other options for injection, say for example, environment variables.
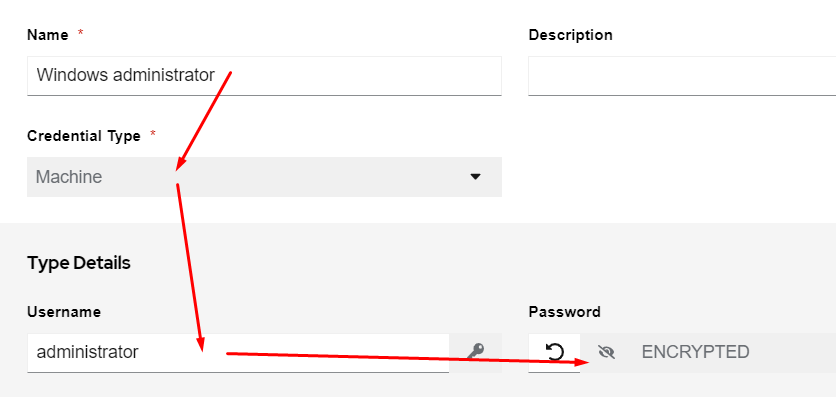
I’ll then go to the resource menu, then the credentials section, and add both a machine credential and a credential of type “generic credential 1”. The machine credential is the username/password that I’ll log into the Windows machine with:
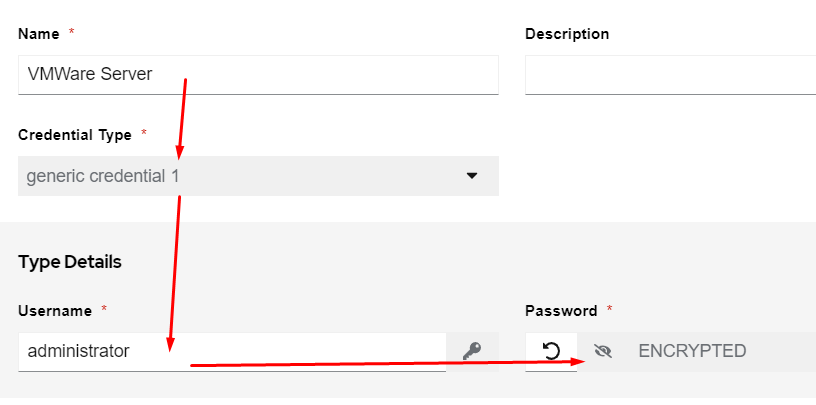
The generic credential is what I use to connect to my VMware server:
Job Template
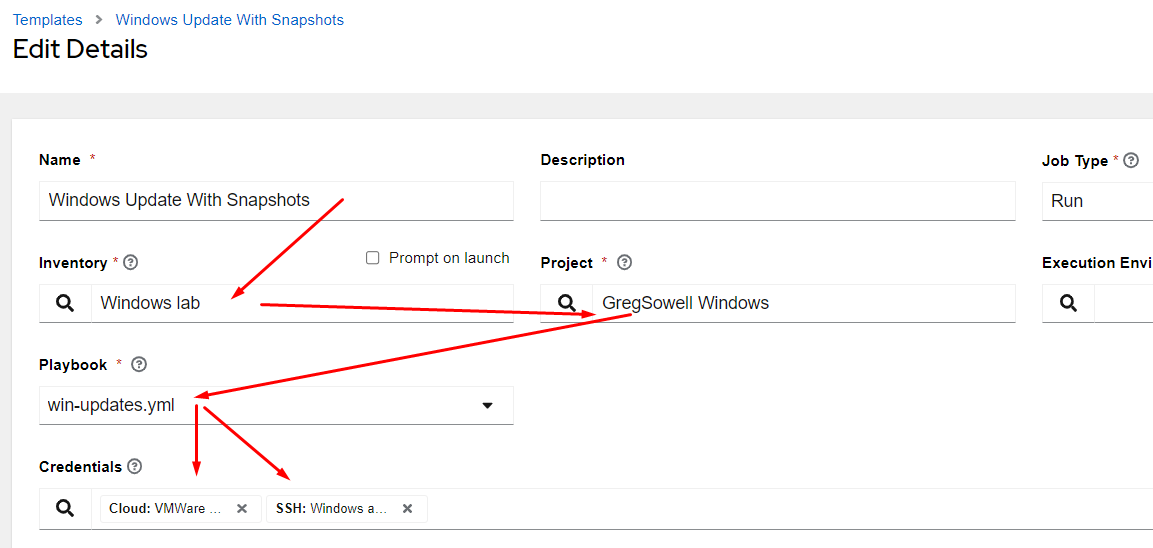
Next, I’ll create a job template that brings all of the components together. In the resources menu, click on templates, add, and then add a job template:

I’ll then give it a name, choose the inventory, choose the project, choose the playbook, and lastly, add my newly created credentials:
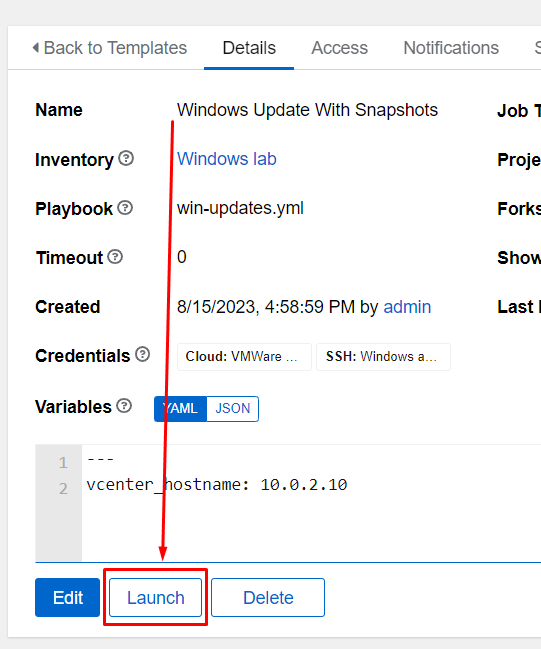
At this point, there’s nothing left to do but click launch:
Conclusion
As you can see, it really isn’t too bad to begin operating against Windows machines. Getting started should be even simpler with this Windows Quickstart Guide!
As always, if you have any questions or comments, please reach out to me or the CIQ team. Happy automating, my friends!
Built for scale. Chosen by the world’s best.
2.75M+
Rocky Linux instances
Being used world wide
90%
Of fortune 100 companies
Use CIQ supported technologies
250k
Avg. monthly downloads
Rocky Linux


