
Introduction
Infrastructure automation is becoming increasingly crucial for managing application lifecycles efficiently and cost-effectively, especially as organizations transition to hybrid cloud hosting. Ansible plays a vital role in enterprise infrastructure automation due to its ability to manage nearly every aspect of the IT stack, and its vast community support. Integrating a GUI/API frontend like AWX to manage Ansible adds even more value, offering features such as RBAC, audit logging, and push-button automation
However, AWX requires Kubernetes, a container orchestration platform that requires a substantial time to learn. That learning curve is further compounded by the different Kubernetes distributions, such as Amazon’s Elastic Kubernetes Service, Google’s Kubernetes Engine, and Microsoft’s Azure Kubernetes Service. Each comes with its own cloud-specific interfaces and requirements, potentially extending the time needed for new users to achieve value from enterprise-level automation to several weeks.
At CIQ, we are pleased to introduce the Ascender Installer, which simplifies this process. The Ascender Installer sets up the Ascender GUI/API frontend for Ansible on all three major cloud platforms in minutes, without requiring any prior Kubernetes knowledge.
Ascender Automation is a GUI/API frontend for running Ansible playbooks, and is a downstream project of AWX from CIQ. As part of the installation process, the installer script automates everything from Kubernetes cluster creation, to installation/uninstallation/upgrading of Ascender, and even Kubernetes cluster destruction. The experience is similar regardless of what cloud platform you elect to install Ascender on, save for setting up programmatic access to your cloud with Ansible. This specific blog entry will walk through a Google Cloud Platform installation, but instructions for all three cloud platforms can be found in the ascender-install github repository.
In this example, the goal is to set up Ascender Automation, in Google Kubernetes Engine (GKE), starting with no Google Cloud infrastructure deployed.
Prerequisites
Installing Ascender on Google Cloud Platform requires:
- An x86 CPU server running an Enterprise Linux Distribution of version 9 and the following packages installed:
- git
- gcloud CLI
- A Google Cloud Platform account with
- Appropriate permissions to create/destroy/manage GKE clusters and associated resources
- You can start with Access Control for GKE documentation to set this up
- Appropriate permissions to create/destroy/manage GKE clusters and associated resources
Pre-Installation Tasks
- The first step for running the Ascender installer will be to create a Google Cloud Project in which to create the GKE cluster, in the Google Cloud Web console. A Google Cloud Project is a resource container within Google Cloud Platform (GCP) that organizes and manages resources like virtual machines, databases, and storage. It provides boundaries for access control, billing, and quotas.
- Instructions on how to create a Google Cloud Project can be found here: Creating and managing projects
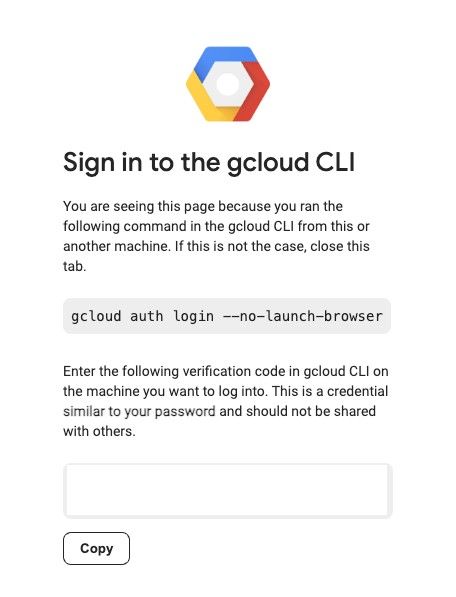
- On your Enterprise Linux Server, run the following command to set the active Google Cloud user to one with the appropriate permissions to run the Ascender installer on GKE:
$ gcloud init. This will open a web browser tab that will prompt you to sign in with your Google account, and provide a verification code that will be used back on the command line. Then, it will take you through options of the active project and region/zone. The existing projects and regions/zones will be presented as a list you can choose from and you can select the project you created.
- Create Application Default Credentials
$ gcloud auth application-default login
- Ensure that the latest version of all installed components is installed:
$ gcloud components update
- APIs within the Google Cloud Project must be enabled:
- If you plan to use Google Cloud DNS to resolve your URLs for Ascender, you must do the following within Cloud DNS:
- Create a hosted zone within Google Cloud DNS. A Google Cloud DNS hosted zone is a container for managing DNS records for a specific domain within Google Cloud Platform (GCP). It allows you to define how DNS queries for your domain are resolved.
- Instructions for creating a hosted zone are here: Create, modify, and delete zones. This assumes you already have a domain registered. After you have created your zone, it should appear like this:
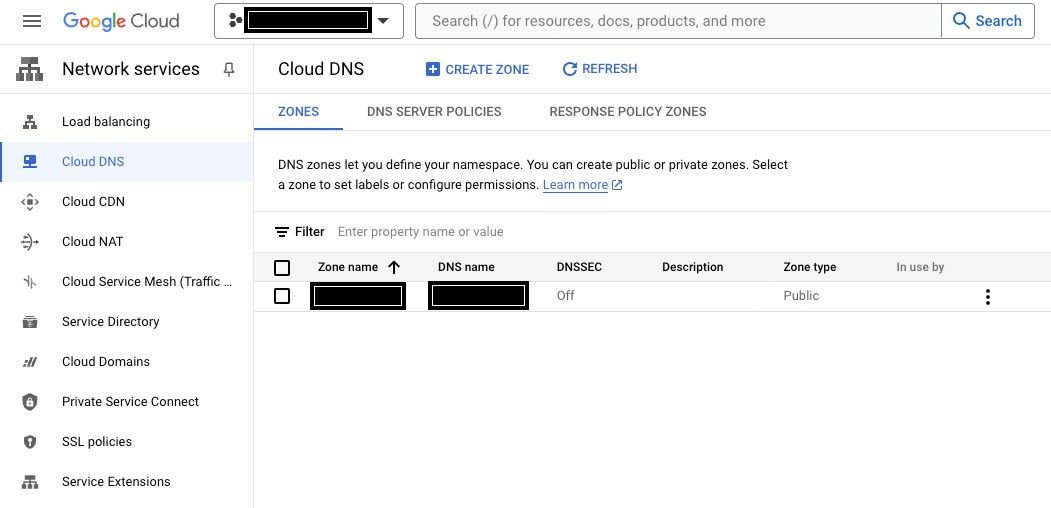
- The entry under Zone name will be required to use as the variable
GOOGLE_DNS_MANAGED_ZONE, and the field under DNS name will be used as the install variableASCENDER_DOMAIN.
Installation Instructions
Obtain Sources
You can use the git command to clone the ascender-install repository or you can download the zipped archive. To use git to clone the repository run:
git clone https://github.com/ctrliq/ascender-install.git
This will create a directory named ascender-install in your present working directory (PWD). We will refer to this directory as the <repository root> in the remainder of this instructions.
Set the configuration variables for a GKE Install
inventory file
You can copy the contents of gke.inventory to <repository root>/inventory.
- Be sure to set the ansible_user variable for both the ansible_host and localhost to match the linux user that will be running the installer.
Be sure to set the ansible_user variable for both the ansible_host and localhost to match the linux user that will be running the installer.
cp <repository root>/docs/gke/gke.inventory <repository root>/inventory
Creating the custom.config.yml file
Run the configuration file bash script:
<repository root>/config_vars.sh
The script will take you through a series of questions, that will populate the variables file requires to install Ascender. This variables file will be located at <repository root>/custom.config.yml. Afterward, you can simply edit this file should you not want to run the script again before installing Ascender.
Some of the variables worth calling out here include:
- k8s_platform: Specificies which Kubernetes platform Ascender and its components will be installed on (In this example it should be
gke) - k8s_protocol: Determines whether to use HTTP or HTTPS for Ascender and Ledger.
- If you select
HTTPS, you'll also be prompted for the following two values:- tls_crt_path: TLS Certificate file location on your local Enterprise Linux machine
- tls_key_path: TLS Private Key file location on your local Enterprise Linux machine
- If you select
- USE_GOOGLE_DNS: Determines whether to use Google Cloud DNS Domain Management (which is automated), Or a third-party service (e.g., Cloudflare, GoDaddy, etc.)
- If you select
true, you will also be prompted for the following value:- GOOGLE_DNS_MANAGED_ZONE: The name of an existing Google Cloud hosted DNS zone for your DNS record.
- If you select
- GKE_CLUSTER_NAME: The name of the gke cluster to install Ascender on - if it does not already exist, the installer can set it up
- GKE_CLUSTER_STATUS: Specifies whether the GKE cluster needs to be provisioned (provision), exists but needs to be configured to support Ascender (configure), or exists and needs nothing done before installing Ascender (no_action)
- GKE_K8S_VERSION: The kubernetes version for the gke cluster
- ASCENDER_HOSTNAME: The URL at which you will be able to access Ascender on your browser
- ASCENDER_NAMESPACE: The Kubernetes namespace where all Ascender components will be installed
- The defauklt value for this is
ascender, and it's fine to keepit as such.
- The defauklt value for this is
- tmp_dir: The directory on your Enterprise Linux server where temporary artifacts will be stored after running the install script
- The default value of this variable is
<repository root>/ascender_install_artifacts
- The default value of this variable is
There are also some values you can set for Ledger, which is a log collection/processing engine, but for the purpose of this blog, we can ignore these values and set LEDGER_INSTALL to false.
Run the setup script
To begin the setup process, type:
<repository root>/setup.sh
Assumuing you do not have a Kubernetes cluster set up already, this script will:
- Install all required packages in your Enterprise Linux machine (including ansible-core and terraform)
- Author terraform scripts to create a GKE cluster of your assigned specifications
- Download the required kubeconfig file to
~/.kube/config, so that you can connect remotely to this new GKE cluster.
- Download the required kubeconfig file to
- Create kubernetes manifests to install both the AWX Operator and Ascender Automation Platform, and perform the installations.
This script should take up to 15 minutes to complete.
Post Set Up Script
You can navigate to the ASCENDER_HOSTNAME you specified in your browser, and log into Ascender Automation Platform with the username and password you specified. From there, you can begin populating Ascender with your Ansible playbook repositories, Users and Integrations to start governing how your automations are run.

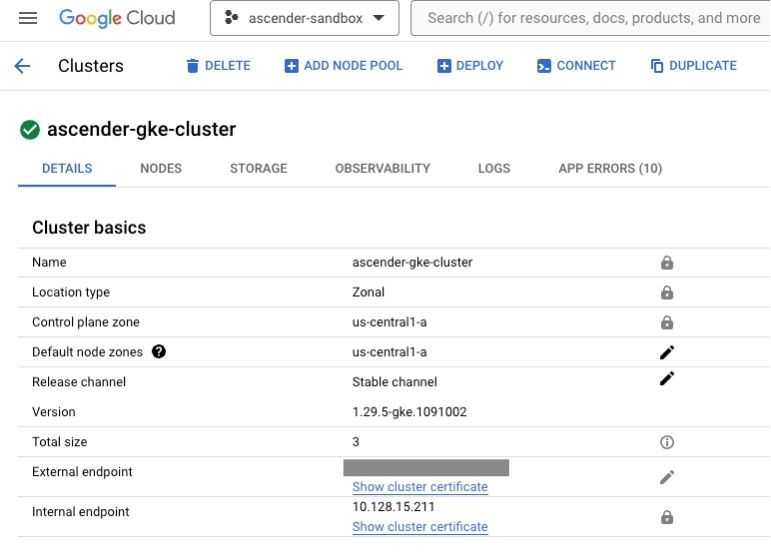
Verification of Kubernetes Cluster Creation
Although not necessary, you can verify that the underlying Kubernetes cluster was created by the installer by going to the Google Cloud Web Console and navigating to Kubernetes Engine → Clusters under the hamburger button on the left side of the page. Below are some details you should be able to see about your cluster:

Upgrading Ascender
Upgrading Ascender is as simple as changing the Ascender container image version/tag that is being used in your deployment, and rerunning the installation script.
In your <repository root>/custom.config.yml file, change the values of these three variables:
download_kubeconfig: Set tofalseas you already have a valid KUBECONFIG file to authenticate to your existing clusterASCENDER_VERSION: This needs to be set to the release of Ascender you wish to upgrade to. As an example, a release should be in the format24.0.0. The list of all releases can be found here: Ascender Releases.image_pull_policy: Set toAlways, as this will force the Ascender web container image to be pulled.
After having changed these three variables, re-run the installer script from the top level directory:
<repository root>/setup.sh
Uninstalling Ascender
After running the installer, the tmp_dir (By default, this is <repository root>/ascender_install_artifacts) will contain timestamped manifests for:
ascender-deployment-{{ k8s_platform }}.ymlledger-{{ k8s_platform }}.yml(if you installed Ledger)kustomization.yml
It will also contain a directory called gke-deploy, if you provisioned a new GKE cluster with the Ascender installer. This directory will contain the terraform state files and artifacts for your GKE cluster.
In order to uninstall Ascender, you can remove the timestamp from the manifests, and run the following commands from within tmp_dir:
$ kubectl delete -f ascender-deployment-{{ k8s_platform }}.yml$ kubectl delete pvc -n {{ ASCENDER_NAMESPACE }} postgres-15-ascender-app-postgres-15-0(If you used the default postgres database)$ kubectl delete -f ledger-{{ k8s_platform }}.yml$ kubectl delete -k .
Tearing down the GKE cluster
To delete an GKE cluster created with the Ascender installer, run the following command from within the tmp_dir:
$ terraform -chdir=gke_deploy/ destroy --auto-approve
NOTE: Although this should be unable to tear down any cluster besides the one created by the installer, use this command with caution as its actions of destroying the cluster cannot be undone.
Conclusion
The Ascender Installer repository provides a streamlined and efficient solution for setting up the Ascender GUI/API frontend for Ansible on major cloud platforms. By significantly reducing the complexity and time associated with Kubernetes, this installer empowers organizations to leverage enterprise-level automation without the steep learning curve typically required. The comprehensive automation of tasks such as Kubernetes cluster creation, installation, and uninstallation ensures a consistent and hassle-free experience across different cloud environments. This repository not only enhances operational efficiency but also accelerates the adoption of hybrid cloud infrastructure automation, making it an invaluable tool for modern IT operations.


Built for scale. Chosen by the world’s best.
2.75M+
Rocky Linux instances
Being used world wide
90%
Of fortune 100 companies
Use CIQ supported technologies
250k
Avg. monthly downloads
Rocky Linux
Have questions about your infrastructure?
Talk to a CIQ engineer about Rocky Linux, HPC, and AI infrastructure.